
You will need:
- foam board
- paper
- marker
- masking tape or other slightly sticky tape
- toothpicks
- floss (optional)
- scissors
- knife
- sandpaper (optional)
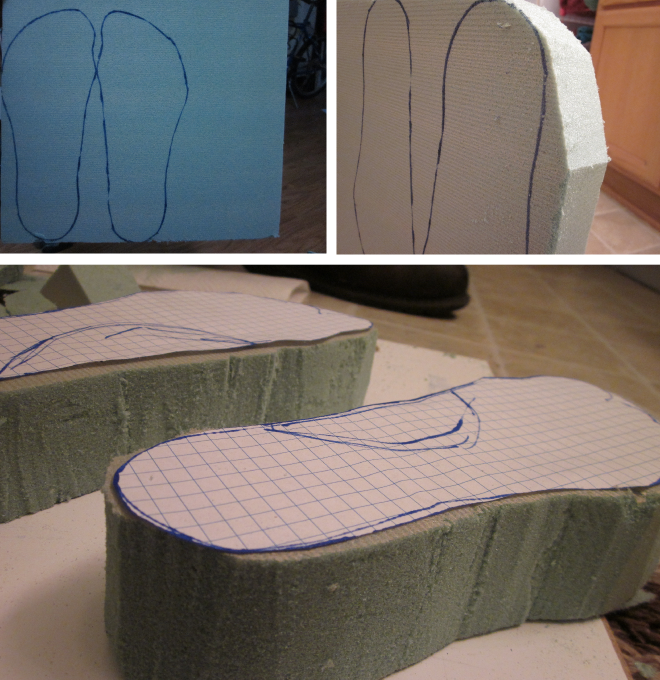
The foam board I bought from the flower section at Wal-Mart. I think normal people use this to make floral arrangements? Here is a picture of the label.If you can find some of that white Styrofoam like stuff people make wreaths and stuff, that could probably work. But get the stuff in a rectangle shape, not wreath shape. That will not work. If you get the size I got (1.8*11.8*17.8) and don't have huge feet, it will be enough. To be safe, make sure there is enough for you to trace your feet out twice on the board.

First, trace around your feet on some scrap paper. Then trace it onto the foam board.

Then, using a knife of some kind (I used one of the big ones in my kitchen) cut out your foot pattern. Try to cut at a right angle if possible so that the piece is approximately the same size on the top and the bottom.
Strategies
You can use dental floss to cut the foam out by gently rocking the dental floss back and forth against the area you want to cut. My brilliant husband thought of this idea!!
Also, it can be helpful to cut out wedges for going around the more difficult angles so you don't accidentally rip the foam board.

Next, lay your foot sideways and trace around it. Then tape it to the side of your foam and trace areas that need cut off.

And cut...

Now set your lasts onto some of the leftover foam board. Mark where the shoe starts to angle downward on the toe. You will not need apiece longer than this. Cut out a rectangle shape wide enough to cover the bottom pieces.

Stab some toothpicks into the bottom piece. Make them fairly perpendicular so you can slide the top part on. Then put the top on.

Now tape that side piece on again and trace the side for the top half. And cut it out.

Spend a good deal of time looking at your foot. Mark on the last where various parts that stick out and where you need to cut a little off. Make sure to cut only a small amount at a time. Start with rounding out edges here and there.

One strategy you can use to get the top the right height is to measure over the curve of your foot in several places and on the last in several places, and adjust accordingly.

So to summarize main areas to shape:

Once you are happy with the shape you made, add some additional toothpicks to enhance the stability of the structure.

Good luck! Happy Cobblering!!


No comments:
Post a Comment