Showing posts with label Shoe Tutorials. Show all posts

23 September 2015

A Moccasin Marathon Success and Leather Boiling Fail: Weekly Update

Hello everyone!

Is is possible that I let two weeks slip away just like that? Apparently it is! Anyhow, here's a recap of what I've been up to the last 14 or so days.

Moccasin Marathon Success

First, let's start with the success, which I managed just yesterday. I made a goal for myself to finish an entire pair of shoes start to finish including the pattern all in one day. I usually work on one project for a couple hours and then switch to another task for a while, but I thought it would be interesting to know exactly how long a pair of shoes takes to make. Now this certainly wasn't ideal circumstances by any means, as I encountered some problems along the way which slowed me down a bit, but altogether it worked out ok. I started around 9:40 AM, and completed them just after 12:30 AM. Don't worry, I took about an hour and a half break for lunch and a break for supper and rejuvenation at the bookstore, so in all, it took around 8 & 1/2 hours to complete one pair of moccasins.

Problems I ran into (in case you were curious) included needing to stop and sharpen my very dull skiving knife, it being difficult at times to see what I was doing since I was working with a very dark colored leather, and working with a cheap awl for some of the stitching.

I bent my nice awl last week and am waiting on the replacement still, so there wasn't much I could do about that. Thankfully my slicing blade awl was still working just fine, so I was able to stitch the soles on easy-peasey as ever. However, I didn't want too big of holes on any of the upper, and so used a crappy awl I picked up from Hobby Lobby's jewelry department. What you need an awl for when making jewelry, I don't know, but I wouldn't recommend the one Hobby Lobby keeps on hand unless you are not going to be poking a lot of holes in one sitting.

I also think I need a good lamp to help with the visibility issues, though it is a little crazy how much more difficult it is to see the darker the leather is. I notice this difference when I do my messenger bags as well.

Skiving Explained

I thought it might be worthwhile to make a little picture to show the skiving process. I skive the edges around the heel bit I add to the back of the shoes for added stiffness, durability and to give it a bit different look than a traditional moccasin style. It is an important step; if you don't do it, it can lead to discomfort while walking because of the ridge it can create where the edge of your foot presses down. It may seem like something so thin wouldn't matter, but believe me, it does! There are lots of other reasons you might skive leather, but this is the main reason I end up needing to do it in my day-to-day activities. So basically, you use a REALLY SHARP knife to taper the edge of the leather from its current thickness to as thin as possible along the edge, making the edge angled, rather than square. The knife has to be razor sharp or this process is a giant hassle, and dangerous too, as it is easy to slip with the knife and gouge your fingers or other nearest body part instead. Here is a picture which I hope sort of shows it visually in an easily understandable way.


 Leather Hardening

Another project I worked on a bit ago was to heat up some of my veg-tanned leather in an effort to toughen and harden it for soles. My husband and I worked on this project together, and used this tutorial. We only left the leather in for 30 seconds, but we must have done it wrong, because in the end the leather was very brittle and cracked when I tried to bend it. We kept it at or under 180 degrees, so the heat wasn't too high. If anyone has any suggestions, I would love to hear them!


Other Projects

Here are some pics of other projects I worked on this week. I made some moccasin boots for a customer, and made a bunch of veg tanned animal cutouts. I also made another messenger bag like this one.


Well that's it for now! I will try to return to a doing weekly update instead of the elongated version, since I think I might have missed some things, and this ended up with a lot of random stuff jammed into it. Happy Wednesday!

09 September 2015

How to Prep your Leather for Stitching Using Leathercraft Cememt

I have now used leather cement a couple of times for holding seams together before stitching, and have found that it works really well, so I thought I would share my method with you all.


I use Eco-Flo Leather Craft Cement, and it seems to work great for this. It is a little messy if you just try to use the bottle to apply, so usually I pour a little out onto a piece of tinfoil or waxed paper and dip a cotton swab into the glue and use it like a paint brush to apply to the leather. This way, there are no drips or excess glue .

What you do is to apply a thin line to the edge of your leather where you want to eventually stitch a seam. I would recommend not making the glue line any deeper than where the stitches will eventually be, so you do not have to rip the pieces apart later. I allowed for a quarter inch seam allowance, so I just made sure the glue was a quarter inch or less into the leather from the edge. Make sure to spread it out so that the glue will not ooze when you squeeze the seams together. I used the cotton swab for spreading and applying glue.
 

Basically, you just continue this down the seam for all of it that you want to glue together. I am leaving the pucker-toe unglued, since it would be too hard to glue an area that will be gathered on one piece and not on the other.


I tried this (gluing the pucker-toe) with Wayne's moccasin boots, and it didn't work out too great. There is so little area you want it to stick in between each pucker that it is very difficult to get even. Thankfully the cement was easy enough to get apart, so it wasn't a big deal, it just didn't help me any in the long run. I instead used the chalk markers to ensure that it puckered evenly along the toe. I placed one hole at each point I had marked with chalk on my pattern and then placed three evenly spaced holes in between each of these holes and this made the pucker turn out great without too much variation along the toe.

Here is how they turned out!


20 August 2015

DIY Baby Puckertoe Moccasins

Not feeling the tutorial? Buy them instead at ceruleanjay.com
I had a friend ask recently about a pattern for my baby moccasins, so I thought I would try to make a quick tutorial about the general process I go through to make my baby moccasin pattern.

Here is a quick graphic showing how I develop the pattern. It is very similar to my Ojibwe Style Pucker-toe Moccasin tutorial, but scaled down and proportions slightly altered to accommodate those little tootsies! I would probably use this pattern for up to 3 years of age. I would want to get a 3 year old to test the doubling width proportion I am using here before applying this pattern past this age.

12 August 2015

Developing a Moccasin Boot Pattern using Prototypes Part 2

Last time we had concluded with a prototype to fit the shoe last.


Assuming everything looked good and fit properly, you could conceivably be done at this point. However, my husband decided he wanted a slightly taller boot, so i cut out a rectangle shape and added it to the top.

05 August 2015

Developing a Moccasin Boot Pattern using Prototypes

I thought I would share a little about how I developed the pattern for the current project I have just completed, my Moccasin Boots.

29 July 2015

Weekly Update: Creating a pattern for the Moccasin Boots

Hello all.

Just had the flu for the past two days, so I haven't accomplished much this week yet. I have, however, managed to make a final pattern for the moccasin boots I was working on last week, and am all ready to have a go at the real thing! YAY!

07 October 2014

Getting Started Making Leather Shoes

A friend suggested this post, so here is everything you absolutely need to know to get started with leather shoe making!

Important tools to have

Awl 

If you don't want to cry and destroy your fingers yanking needles through holes, an awl is an absolute necessity. An awl is basically a pointy stick you will use to poke holes in the leather to sew through. Leather isn't like cloth, so it doesn't have holes in the weave to allow a needle through, so you will be making all the holes yourself.

When I first tried making shoes, I didn't buy an awl, and I tried to yank each stitch through using only sewing needles. I bought some cheap ones from hobby lobby and ended up breaking all 5 or six of them on one shoe. Not recommended. Also make my fingers hurt and my arm sore.

There are many kinds you can choose from, I recommend getting one that is not super long, and doesn't have a terrible long handle either. Another mistake I made was buying my first awl from hobby lobby. It was about 6 inches long and was ridiculous to handle at that length. Though a thousand times better than just the needles. 

Needle

Buy leather needles. They are better. Unless you already have needles because you do a bit of sewing sometimes. Then use those. Don't buy fancy ones until you know you like working with leather. They aren't expensive, but why buy something when you have something else that works just fine for a trial run? The leather ones are a little thicker generally, so a little more durable when you need to yank through a hole that is not quite big enough.

Artificial Sinew

I like artificial sinew (waxed, flat lacing)because it is easy to split if needed, is pretty durable, and gives that natural fresh-from-the-forest look I'm going for. Some stuff is more like rope and is twisted. That stuff is fine too, I just don't prefer it personally. The important part is to make sure it is waxed to provide protection from water damage, and to make slippery enough to make the stitching easy. Also don't get cotton, I am told it can degrade over time. Get something good and synthetic that won't decompose on you if it does get wet.

Leather Thimble

You can make this item using scrap leather and your newly acquired awl, sinew and needle.

Vegetable tanned leather is good for protection but not very flexible. I made a short one to protect my thumb with this type of leather.

A thin garment type leather is good for a thin flexible one that will give you a better grip on the needles. I made mine out of 2-3 oz deerskin.

Box Cutter

A razor blade, exacto knife, etc are very useful for cutting out thick sole leather.

Scissors

Good for cutting thread and thinner leather.

Contact Cement

Can hold shoes together fairly well, can be used to glue soles on, or glue them in place before stitching them more securely.

There are lots of other useful tools to have, but these will get you started enough so that you can make a pair of shoes without too much difficulty.

Important things to know about leather

Here are some basic info about leather that may help you when trying to decide what type of leather to buy for your shoes. The first leather I bought was vegetable tanned, and was so stiff I couldn't really make anything practical or beautiful out of it. The second leather I bought was some 2-3oz deerskin that while beautiful and soft, was too thin for my shoe making needs. I finally got it right when I bought some  3-4 oz deerskin.

Ounce/weight

The thickness of the leather is expressed in ounces. Two-three oz leather is usually pretty good for making clothing, but will require a lining if it is to be used in shoe making. Anywhere from 3-5 oz leather is a good range for a lightweight leather for shoes, though keep in mind they might stretch a bit at this weight, especially if it is deerskin. When it is more in the 5-6 oz range, the leather is a bit thicker, and is what I am using now to make moccasins. The ones I made for myself are 3-4 oz deerskin, and my new stuff is 5-6 oz cow hide. Both seem to be good for moccasins, and I think the stuff I have now would be good for making leather work boots and the like. Slightly less flexible, and slightly less stretchy than the 3-4 oz.

I buy thick stuff for soles, anywhere from 8-12 oz cow hide. Vegetable tanned leather also works if you want a thin sole that will develop a patina and wear pretty well indoors and outdoors on grass (not sidewalks and other concrete stuffs).

Cow hide vs deerskin etc

deerskin BABY MOCCASINS!
In my experience, deer, and deer-like animals (I have also gotten elk) seem to have very soft, velvety, and stretchy hides, while the cow tends to be thicker, stiffer, and a bit less stretchy. 


Tanning

Vegetable tanned-
Results in a stiff leather, not recommended for shoe making unless I suppose you wanted to use it as heel stiffener or something like that.At least the stuff I bought so far.

Brain tanned-
Very wonderful, soft flexible leather. It is a difficult process to tan a hide this way though, and so is more expensive. Makes excellent soft, flexible boots and moccasins that are wonderfully warm and cozy. This is the traditional way leather used to be tanned in the old days by Native Americans.

Chemical tanned- lots of leather is tanned by chemicals. Sometimes this bleaches the skin, so that it can be recolored with dyes. Depending on the type of leather and thickness it can be good for making shoes. Much cheaper and faster to produce. This is a lot more complicated than just "chemical tanned" and there are many chemical methods, but this is enough info to get you started. I would probably buy something chemical tanned the first couple times so you don't waste too much on brain tanned. Also it is much easier to find.

Type of grain

Grainy-
Original grain of the leather left on, a more natural look. The grain would be the part that is on the outside of the animal, where the hair would grow out. Full grain means that the hide has not been split into thinner sections and top grain. It originally meant it had the original grain on it, but now could mean that a grain was printed onto one of the split pieces

Suede-
Leather that has been split, or the grain has been taken off. Velvety look and feel.

Buffed-
The grain has been buffed off to produce a suede. Could also mean that the leather has been rubbed smooth to bring out a shine to the leather. I am currently using buffed cowhide to make moccasins.

Important stitches to know

Whip stitch-This stitch goes around and around always entering the leather form the same side. Is a good way to finish edges in cloth, but it also allows leather to flatten a but better, so Is good for sewing soles on turn shoes, so there isn't a seam to step on. Better if you are planning to add a sole to the bottom, as whip stitches are visible and would come into contact with the ground and wear quickly.

Running stitch- Just a straight stitch, up and down, from both sides. For sewing buffs, don't stitch this like a sewing machine, but all the way through to the other side each time. That way, if a stitch or two breaks, the whole thing won't be undone as quickly.

Square knot-
This is a pretty basic and easy knot that will work well to make sure your artificial sinew doesn't become untied once you are done stitching.

There are a ton of useful stitches to know in leather working, but these basic two will get you pretty far. If I were to suggest another stitch to learn, the baseball stitch can come in handy once in a while.

Important terms to know

Here are some important terms that are used in shoe making. Not a complete list, by any means, but enough to help you out a little as you read other blogs about shoe making.

Collar-the opening of the shoe, hole where your foot goes into the shoe
 
Uppers-the top half of the shoe

Insole- the part that touches the bottom of your foot, found on the inside of the shoe

Sole- the outside part that touches the ground

Toe box- the room for your toes at the end of the shoe, often there is a stiffer piece of leather inside to ensure that the toes have plenty of room

Heel-the part of the soles under the heel area that is thicker

Last- a form, often made of wood or plastic in the shape of a foot for making shoes

Quarters- the sides of the shoe, part of the uppers

Vamp- the top of the shoe, part of the uppers

Turn shoe- a shoe that is stitched inside out and is turned right side out later, common in Medieval Europe. 

Moccasin- a soft leather shoe without a heel, usually referring to any Native American shoe with a soft flexible sole

Hopefully this information is enough to get you started. If you have any questions, I would be happy to help! I am still learning so I may have to look somethig up, but feel free to ask!


Happy shoe making!!

17 September 2014

Regency Style Jane Austin Turn Shoes Project

Tried something a little different, let me know what you think!
Just a little visual tutorial on some pretty simple regency era turn shoes. I haven't had time to take pictures of the real deal, and this sounded like a fun project, so I decided to work on it :) If you are getting confused, here is a link to my Blue Lace ballet flats tutorial, and for a good start on a shoe patten, this tutorial I made would work marvelously!!


12 September 2014

Adding a sole to your shoe! (Leather Sole)

Hey guys I have to share with you the coolest thing I have just learned! I learned how to make a channel in a leather sole to attach it securely without fear of ruining the stitches by walking on them, and not having to do crazy extra amounts of sewing a welt and all that stuff.

I didn't intend to make cool legit awesome soles for my moccasins. I was content to keep the thin vegetable tanned soles I had glued on simply as a slightly stronger protection from the outside ground, side walks and the like. I had wanted more-so to protect the super soft deerskin of my shoes than to protect my feet. I was going for a natural as traditional as possible style with these shoes.

Unfortunately the dang sole kept coming unglued. Annoying, but I was committed to keeping the protection to my soles so I just glued them back on every once in a while.  It seemed though, like every time it rained, the soles came unstuck again.

Then disaster struck! I was walking around in the dew covered grass at my in-laws and got my precious shoes wet! No matter! I hung them on a branch to dry, and left them out in the sunshine. When I returned I realized that one of them had blown down from the tree and found its way to Shep's lair!!!!! (Shep is the dog) He had managed to make a pretty good slice in the back heel on the left side. :(

I decided to add another piece of leather to patch the ends. Sort of ruining my official moccasin look, but oh well, maybe I could attach a decent sole while I was at it. Here is the patch. I made it the shape that a lot of shoes are on the back for heel support reasons, and while the support I needed was more just for the patching, I figured it would look a little prettier this way and maybe have some nice heel support while I was at it.


After looking into it on one of my favorite shoemaking blogs, Bespoke Shoes Unlaced, I came across this awesome article! I didn't go all out creating a welt and such, since I really just wanted a sole and wasn't ready to dive into all the intricacies of a handmade Goodyear welt type sole, but I decided to try the channel idea out for fun.

The basic idea of a channel is to create a space where the stitches can lie that will not be directly touching the ground while walking. This creates more durability in the long run because the stitches will not wear through and break. I made a simple diagram that hopefully illustrates what I was trying to accomplish.


Hopefully this illustrates the concept fairly simply. I started out by gluing the insole and sole to the shoe and letting it dry. I wanted those piece to stay where they were at while I was sewing them to the shoe.

The next step is to mark out and cut the channel. I didn't take a picture of marking the line, but basically I used a pointy object to press enough of a line into the leather so that I could see when I cut. I tried to make the line as close as possible to the edge of the sole. I used a fresh blade when making the cut to ensure a sharp clean easy cut. It was a lot easier than I thought it would be actually. I think the key is, super sharp knife, and even pressure while cutting.


Using a flat-ish object (like a flat-head screwdriver) pull the slice you made open a little to expose the area for stitching.


Next, use an awl to make holes through all layers of the sole, insole, and upper and stitch using a running stitch. Make sure the holes you make are plenty big, the cut leather slice will cover the stitches up later making the whole thing fairly waterproof, so larger holes are ok!


Once the soles are stitched all the way around, tie a good knot between the insole and the main part of the shoe (uppers) so that the knot isn't exposed to anything that could make it untie. Use a good tight square knot.

Then use a semi blunt object to rub the stitches to make sure they are all laying flat in the channel. I used a knitting needle because I had one laying around, but the official suggestion from the bespoke shoes unlaced blog is to use a deer bone. This is to make sure there is no
ridge along the channel  when you put it back together.


Using a paintbrush, paint contact cement into the channel and wait about 10 minutes or until it is tacky. Then, using a hammer, rub the lifted leather back into the space where it was before you cut it. When everything is relatively smooth, hammer the sole along the edges and across the entirely of the sole. This will both smash the cut channel back into place and compress the leather making it much more durable over time. If you can, place it against a hard surface so you can hammer pretty hard. However, you don't want to hammer dents into the leather either, so if you make any, try to hammer around the area to smooth it back out again, and proceed a little more gently.

About half way through hammering. See how the channel is flat, but could use a bit more flattening!

Let dry and now you have a beautiful, watertight sole that will last many miles of walking! The beauty of a leather sole is not only is it breathable, but it also will conform to the shape of your foot after a few wears, creating a custom fit!


Note: The soles are only as waterproof as the leather is. If you are walking out in the rain for an extended period of time, the leather will get wet and make your feet slightly damp. But it shouldn't leak thorugh the stitches if you have adequately glued the channel back into place. I walked through a river-like puddle flowing through the HyVee parking lot earlier this week, however, and the only part that seemed to get wet was the tops from the raindrops, so I think it will resist a lot of water!

Happy shoemaking!!


08 July 2014

DIY Ojibwe Pucker-Toe Moccasin Assembly (Part 2!)

So yesterday we were talking about making an Ojibwe Pucker Toe Moccasin Pattern. Today I am going to show you how to sew your moccasins together!

To assemble, line the marks, horizontal and vertical, from the top and bottom and run a piece of sinew through each as place holders. Use your awl to pierce the holes before you run the sinew through. Hold the awl like so, and make sure your other hand grips the leather close to where you plan to pierce it. But don't stab yourself! Be careful!


Pierce holes where the horizontal marks start, and at the vertical mark if you made one. Make the marks far enough away from the edge so they do not rip out later. A quarter inch should be plenty. For the vertical mark, run a short piece of sinew through and tie with a knot you will be able to undo later. You will just use this mark to make sure everything stays evenly puckered on either side. For the horizontal side pieces, tie a good solid knot and use a 2-3 foot long piece of sinew. I made a square knot which I plan to melt slightly with a candle to make the knot hold fast.


Using a simple straight, or running stitch, make the first couple stitches on both sides. The first few do not have to be puckered or gathered. See picture below to see what I mean.


For the next part, with each stitch, pull the bottom fabric in a little so that it gathers slightly. The trick is to make them as close to the same amount gathered each time so there are no major puckers. If it helps, you could have a set number of stitches marked with chalk or a marker to make it easier to be consistent. If you do this, make sure there are the same number of holes for the top as the bottom.


Once your stitches meet up in the middle, you can go back through the same hole with the opposite string, like seen below. You may need to add an extra hole to make sure they are going through the opposite way as the first string. Eg. If the left string went under at one point, the right string will go over.


Finish by tying a knot. If you like, you can continue around top part like I did.


Next, you will have to stitch the back together. A whip stitch is the easiest for this task. Stitch around the top part as seen below.


Now you may want to round the edges of the tab leftover before stitching it down. Just trim to desired shape with scissors.


Using a whip stitch, stitch the tab to the heel portion of the moccasins.


You can stitch around the top of the ankle if you like for added durability like I did, or wear as is! I would definitely recommend the extra stitching around the top, as the leather will be under some strain as you walk in the moccasins. And that's it! Pretty simple, huh? You can cut out a sole and either glue or stitch it down. If you want, you can follow my tutorial for sewing a sole using a channel. Also, a cuff could be added to make boots. If following this tutorial, don't hesitate to ask me any questions you may have!


Good luck!Happy shoe-making!

Click here for a few more pictures of the finished product!

07 July 2014

DIY Simple Ojibwe Pucker-Toe Moccasins

CLICK HERE for more views of the finished product on at my Etsy store!

So I decided it was high time for another shoe tutorial! I haven't been completely lazy this last month or so though, my friends, I just didn't take the time to make a tutorial for my most recent project, an pair of leather flip-flops that are amazingly comfortable!!!

I had hoped to make a tutorial for these, but then I got sucked into a fun fairy tale theme painting project and have spent the last few weeks consumed by that project!

some of the projects...

Do not worry, I will catch up some time soon and add a post about these, as they were super easy and a fun project for an afternoon or so. However, I just finished making a pair of traditional Ojibwe style pucker toe Moccasins, and have the tutorial images ready to go, so here we go!

For this project you will need:

  • paper
  • sharpie marker
  • awl 
  • sinew
  • needle (preferably a leather needle)
  • 4-5oz deerskin
  • thick cow hide or rubber for solesif desired

The Ojibwe tribe used soft-soled moccasins for several good reasons. First and most obviously, the deerskin used was readily available, and one of the best materials around for making shoes in those days. More importantly, however, the soft sole allowed one to be very quiet while walking through the woods, which was essential when hunting or scouting for danger. In addition, being animal skin, it was very breathable. This made them cool in the summer, and warm in the winter. Another plus is the deerskin molds to the shape of your foot after a few times wearing, which results in a very comfortable piece of footwear! I recommend using something between 4-5 oz leather for this project. Deerskin or elk hide make very nice moccasins in my experience.

link to photo used

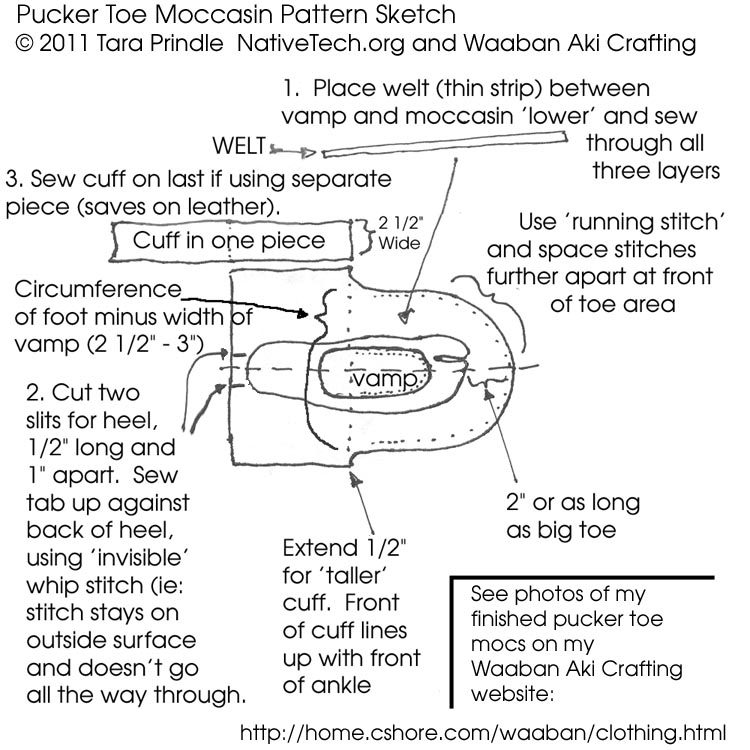
The pattern is relatively simple, and very easy to adjust to each and every persons' individual shoe shape. As with most shoe patterns, it all starts with a simple foot tracing. Use a piece of paper or two taped together. Alternatively, you could use a paper grocery bag or another larger piece of paper you have. Be sure to smooth out any crazy shapes, like individual toe bumps and any bumps made accidentally by your ankle as you trace your foot. Draw a line splitting the shape in half horizontally and vertically. The horizontal line is a perfect spot to start the ankle portion of the shoes, so we will add that later here. The vertical line is useful for getting the heel centred, as well as a good mark for ensuring an even pucker as you sew the moccasins together.


I would suggest cutting this piece out and tracing it onto two other pieces of paper. That way you can have one original you can save for later, or use to cut out a sole from thicker leather (7-10 oz cowhide recommended). Piece two can be used to make the upper or top piece. The third piece can be used to make the lower part of the moccasin.

Below is the top part of the moccasin, no seam allowance is needed, as there will be plenty extra on the bottom, and it will stretch a fair bit since they are made out of leather. The curve starts at the horizontal line. It doesn't have to be curved, it could be straight across, just looks prettier with the curve in it. Mark at horizontal line will help you get it lined up with the bottom part when sewing. You could also mark at the vertical point for more precise gathering later.


Next for the bottoms, mark 1 inch from the tracing round the top  part of the foot. Once you have reached the widest part of your foot, draw the line straight,running straight back to the back line. Add 3/4 inch to the edge behind the horizontal line. This will be the cuff around the ankle. Also mark this spot. This way you will be able to line it up with the uppers/top part. Also mark the vertical mark if you want just like the top for precise gathering.


When cutting out the leather, place on the leather as close as you can to the center back of the animal hide. This is where the skin is the thickest, and therefore most sturdy for wear and tear.  Place it so the stretch is horizontal. You will not want your shoes to get too long when they stretch! Also remember to flip the pattern over so you make both a left and a right shoe!!!

Generally, I trace them with a permanent marker and the cut them out using a sharp pair of scissors. This is how they looked on the piece of leather I bought.


I will post a part two tomorrow on the assembly part for the moccasins. Yawn, but time to go to bd for now! :) Have a lovely night, and happy happy shoemaking!


Links I used to make my pattern:
Indian Moccasins
Native Tech
Wilderness Survival Skills

Update: I just made another moccasin tutorial with an adjusted pattern for Baby Size Moccasins for anyone interested in making some for their little bundle of joy!

Popular Posts