

 For April, I am making a bright teal pair of ballet flats. To make things easier on myself, I invested the $4.50 for this awesome pattern by winter peach. (see right) Please purchase this pattern if you want to follow this tutorial! It is super cheap, and you can make shoes for all your friends because if comes with 7 different sizes. It also comes with really awesome instructions. They are easy to follow, even
if you haven't a lot of know-how in the pattern department. Also it supports a small business, and is a pretty useful pattern overall :)
For April, I am making a bright teal pair of ballet flats. To make things easier on myself, I invested the $4.50 for this awesome pattern by winter peach. (see right) Please purchase this pattern if you want to follow this tutorial! It is super cheap, and you can make shoes for all your friends because if comes with 7 different sizes. It also comes with really awesome instructions. They are easy to follow, even
if you haven't a lot of know-how in the pattern department. Also it supports a small business, and is a pretty useful pattern overall :)I am also making a tutorial on a custom fit shoe pattern that you could follow and just use that pattern! HERE is the link to that tutorial
Without further ado, here is what I did to make some beautiful shoes! So for this one, I put my foot on the interfacing sole pattern piece to determine a proper size. I settled of the size 9, since the 8 seemed a bit small. I am usually a size 7 1/2 or 8. I think reviews on winter peach's site said to go up a size if you are a half size.
I had some teal linen lying around leftover from my wedding, so this is going to become the outside of the shoes! The inside is an acrylic material from a dress I made last year. Here are the cut out pieces below, along with my fancy new tool from my lovely and generous mother-in-law :)

The first step is to place right sides together and stitch around the inside edge of the uppers (uppers=top part of shoes for the newbies out there). Cut up to--but not through the stitch to ease in flipping inside out later.

Next we are going to iron the uppers flat. This is much easier to do now than later when the shoe is trying to be all 3D shaped and all. We will also pin the lace in place. First flip the uppers so right sides are out and iron flat. Next, lay the lace under the upper and pin it exactly where you want it to be sewed down. Make sure both sides are even with each other.

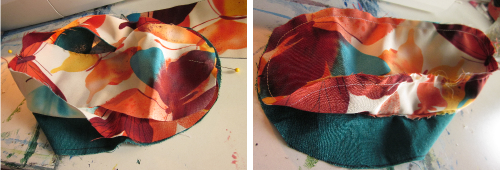
Now we will sew the heel portion together! Open the uppers at the back so they look like the picture below, and sew together. Just leave the pins in at the bottom where the lace is, we will stitch this down with a top stitch after we get the heel right.

Now we will attach the sole liner to the upper liner fabric. (this is the white butterfly fabric in this case) Use a lot of pins, then carefully sew around the shoes, paying careful attention to seam allowance.
Now being careful to not hurt yourself with the pins, carefully try on your shoes to see how they fit. Don't worry if they do not fit perfectly, we will fix them in the next installment of this tutorial.
Happy shoemaking!


Love the lace inset...
ReplyDeleteThank you! It is a little stretchy, which I think will be good...
ReplyDelete