28 March 2014

Whale Shoes Update Suprise!

I think I am breaking some rules by posting two blogs in one day, I like to have them spread out throughout the week, but I don't care! I have to show you my exciting new project!

Soo... I may have gotten carried away and stayed up half the night making these little guys.. But really, who could stop when they are in the middle of making super cute whale shoes? Seriously. WHALES!!! Anyways, here is a lovely picture of my latest cobblering endeavor, and I will be spending the next few days cranking out a tutorial on how you can make your very own! And I promise, no complicated pattern drafting this time! These are really rather simple to make, and everyone needs a few dozen ballet flats laying around for each and every outfit that awaits. Am I right?

Ok, enough talk, here are the goods!


I haven't trimmed the sole from the left shoe there yet, (at right)

Have a lovely day, and happy cobblering!!!

How to Draw a Killer Whale

Ack! I let the week get away from me! Here is a tutorial on how to draw a killer whale. It's a wee bit late, but better late than never, right? Can anyone say, "Free Willy?"

For this Tutorial, You will Need:

  • A black Sharpie marker
  • Some paper
Below is a simple follow-along guide!


24 March 2014

How to Dye your Wool Shoes

Here is a quick tutorial on how I dyed my shoes a lovely pinky purple color!

For this Project, You will need:

  • Rit Dye in color of your choice
  • vinegar
  • water
  • something water proof and heavy
  • bucket
  • wool shoes
  • optional: foam shoe lasts


Pour 1 cup vinegar  into a bucket of HOT water. (Approximately 3 gallons. Add about half your dye if using the 8 oz size. Put your shoes into the bucket.

I left mine on the lasts while dying just in case they wanted to try to shrink up on me. As a result, I had to place a heavy object (in this case an old cappuccino mix container filled with rocks) on top to keep them from floating on the surface.

Leave in there for a good 30 minutes. 


When 30 minutes has passed, be sure to rinse completely with cool water. I filled the tub with some water and shook the shoes around in the water to avoid using tons of water. Be aware that the dye can and will stain your tub. I had to bleach the tub later to get the dye out. This got the stains out for me, but I can't guarantee this method for all tubs, so be careful. Use something that doesn't matter if you stain it if you can, just in case. In fact, anything near the dyeing area or anything you plan on touching during or after this project, just plan on it getting dyed just to be safe.


 Allow to air dry. Do not dry in dryer. This could shrink your shoes. I ruined some expensive wool socks by shrinking them excessively in the wash. Good luck, and happy cobblering!

18 March 2014

How to Draw a Fox

People are going crazy over foxes these days, and for good reason! They are awesome and cute and I think I want one as a pet someday! I guess I'll have to stick to drawing cute ones instead.


Here is a quick tutorial on how to draw a fox of your very own.

For this Tutorial, You will Need:

  • A red,pink or orange marker
  • A black pen
  • Some paper
Below is a simple follow-along guide!


17 March 2014

How to Make Felted Shoes:Fulling

The second part of making felted shoes is a process called fulling. Currently, your shoes are just sort of matted down and tangled, but it still needs to be fully felted so that it becomes one solid material.

To do this, you will first need to remove the plastic pattern piece for inside the wool layers. To do this, cut a small hole in the wool as pictured below. Make it smaller than you think you will need, because while the rest of the pattern will shrink to the size of your foot, the hole seems to stay the same size.


Flatten the wool to the size and carefully roll up in your netting material. Then, using firm pressure, roll back and forth about 20-30 times. Unroll, reposition wool in a different position, and repeat. Alternatively, you can roll the shoes up in bubble wrap or a bamboo mat like THIS one.


Add water and more soap if necessary. It should be squeezing out some suds each time you roll it, this especially at the beginning. Each time you change position, pull the interior apart as pictured below to make sure you do not stick the insides together. To do this, simply put your hand into the shoe as you change position.


Continue doing this until the shoes are fully felted, or the same size as your shoe lasts. When they become small enough, slip onto the lasts. They should fit snugly. This process should take a long time, I think it took me about 3-4 hours. I guess if you are good at it and know what you are doing, it takes an hour.


Be sure to rinse out all the soap in your shoes. Run them under cold water, or rinse in several baths of cool water until suds no longer come out of them.


If you started with white wool like I did, you may want to dye them a different color. Here is a tutorial on how to do this!

15 March 2014

How to Make Felted Wool Shoes: Felting

Here is a set of instructions for making felted wool shoes. I wasn't able to find a really good tutorial online, so hopefully this will be helpful. This post will be on felting, the first step in making felt. The next post will be on fulling, which is finishing the felt, so that it becomes sturdy and does not fall apart.

Disclaimer: This is my first try, and they didn't turn out perfect, but I think the basic instructions are good for someone looking to try this method for making wool shoes. 

You will need: 

  • bubble wrap
  • Sharpie marker 
  • scissors
  • a bowl with soapy water 
  • a cup for pouring water wool batting 
  • a bar of soap
  • a large towel or two
  • 1/2 yard slippery material like acrylic or polyester
  • shoe lasts, I am using the ones from my previous tutorial 
  • a hard, waterproof surface to work on

Step 1: The Template

First you will need to make a template for your shoes. Trace your foot onto bubble wrap with a Sharpie marker. Add 2 cm around the outside. Cut one out for each foot. This will be your template for the wool shoes. You can smooth out any bumps, since these details will be lost in the process of felting your shoes anyway. Cut out with a scissors.


You are now ready to set up for the felting process. Be sure to allow plenty of time when you decide to start. You have to do it all at one time I think. It took me somewhere between 4-5 hours since I didn't really know what I was doing and had to refer to my sources several times throughout. I think they say it takes at least 4 hours even if you are an expert felt making genius.

Step 2: The Set Up

Lay a folded towel on the floor or counter or whatever surface you decide to use. Make sure this surface is one that is ok to get wet for several hours i.e. not carpet or hardwood floors probably. Linoleum is good. A glass top table could work.

Place a piece of your slippery material on top of the towel. Some sites I read did not do this, but I did, so my tutorial will tell you to do it so I don't trick anyone into accidentally felting the shoes and the towel together irrevocably.

Place your template on top. The set up looks like this:


Make sure your wool, water, and soap are within reach.

Step 3: Laying the Wool

Now we will put a layer of wool on the template, using the template as a rough guide on where the wool should go. When grabbing the wool, pull off small bits at a time, as seen below. This will allow more control over how much goes on at a time, and pulling the wool like this makes all the fibers of the wool lie in the same direction.


Do the first layer one direction, making as even a coat as you can. Then make another layer in the opposite direction, as seen below.


Step 4: Add Water + Soap

Cover the wool pile you made with the slippery material. We will call this material "netting" because it seems to be the common term for it. Doesn't look like a net in any way though. Pour a little water at a time on top and gently rub into the wool. Get all of the wool wet.

Rub the soap between your hands, adding water to get a good lather, then firmly rub into the wool through the netting. Keep rubbing until the wool is completely sudsy in all areas.

Step 5: Flip and Fold

Carefully peel the netting off the wool. Then carefully flip the wool so that the template is on top. Fold the extra wool from the edges around to the top.


Step 6: Repeat 3-5

Add more wool, one layer in one direction, one in the opposite direction. Cover with netting, add soap and water, rub in, and flip. (we are repeating steps 3-5). Repeat until you have done this 4 times, two for each side.


Look how goofy big it is! Don't worry, this is ok, it will shrink as we do the fulling. If you didn't do both shoes at the same time, do the second one now.

Please follow the next step, a process called "fulling." It will fall apart if you do not do this step.

Thanks, and happy cobblering!

video sources: felt making, shoe making
web sources: felt making

13 March 2014

How to Use Blogger to Create an Attractive Portfolio

Want to make an attractive portfolio that is simple to update? Making an online portfolio can be a simple way for people to easily find your work. I found an incredibly easy way to make one using Blogger that looks very  professional.


First sign up for a Blogger blog. When you are on the main screen, choose template, then customize.


Once you have that opened, choose dynamic views in the template designer. You can look through the different options, but when you decide which view you want to be the default (the view people see when they first enter your site) click that option in the black area under the dynamic views selection. If you just choose the view in the preview area below, it will not be saved as the default. I chose sidebar.

If you only want people to be able to see the view you have selected, this is a great tutorial for how to disable other views. If you do not do this, people can scroll through the options and decide how they will like to look at your content. I chose to leave it open ended. 


Then you can edit your site to how you want it to look. I changed very little, since I liked the clean cut look of the original. I just changed the header (the dynamic view options) to font "Walther Turncoat" and the title of the blog to font "Syncopate."


To keep the look simple, when you add a new piece, make the title of your piece be the title of your blog post, and add the image in the text box area.


I make all my images extra large, but you can make them smaller if you like. I prefer a larger image to one that can be seen in its entirely without scrolling. If I wasn't lazy, I would go in and edit the dimensions in the HTML mode to exactly fit your screen.

Depending on the screen size that other people are using to view your site, it might cut off anyways, so I keep it simple with the extra large size and call it good.

So there you have it, a simple, clean looking portfolio you can easily update and can easily be accessed online. Click here to see my portfolio better. 

11 March 2014

How to Draw a Whale

I bough this lovely whale fabric the other week, and now I just can't get enough of whales! They are beautiful, majestic creatures, and also pretty cute! Here is a tutorial on how to draw your very own cute, cuddly whale friend. :)


For this Tutorial, You will Need:

  • A blue marker
  • A black pen
  • Some paper
Below is a simple follow-along guide!


07 March 2014

So this is my Life: MAKER

Hello there.

I have been a posting fend the last couple weeks and I thought I would share with you my inspiration for the flurry of activity on my normally sluggish, sporadic blog. I have spent the last two years doing some serious soul searching. I have tried things I liked, and things I didn't. And I found that I really like making shoes :)

Two years ago, I was finishing up my super senior year in college, and was terrified. I had just gotten engaged to my wonderful husband, Wayne, and we were both trying to figure out where life was headed. I spent hours job searching, and none of the jobs sounded even remotely like what I had expected four year of college education would set me up for. As an established introvert and homebody, I was terrified I had majored in the wrong thing, (marketing) and that my life was over. Each job sounded more dismal than the last, and I was afraid I was stuck on a path where I could never be happy, and never succeed. My life was in limbo and I was afraid I would be stuck forever.

I spent the next couple months focused on graduation, and planning a wedding, hoping that things with the career would fall into place eventually. Out of desperation, I applied for a job at Burgie's Coffee and Tea Company, a local coffee shop. I got the job, and hated it. I did everything wrong, I was expected to be friendly and outgoing ALL THE TIME, and I couldn't quite get with the rhythm of the busy coffee shop. The only thing that kept me going was the notion that if I stayed 6 months, I would either get the hang of it or that I would be there a socially acceptable amount of time that I could move on and get a real grownup job.

And right around the six month mark, I started to get better and enjoy my job. I was put on "sandwich station," one of the more labor intensive shifts at the cafe, and I found out that I enjoyed keeping busy, the pressure to always be chatty was lifted, since I was working on so many things at a time, and the more socially adept could be left to the conversing. I also realized how much I LOVED making sandwiches! There was something to the challenge of cranking out six or seven sandwiches at once, but I realized that I just love MAKING things. And I thought back on things, and realized that that was always me. I learned to mix paint colors at five, how to sew at seven or eight, I was drawing in 2 point perspective by ten. I always enrolled in art classes, loved the hands on parts in biology, and loved making extravagant meals once in a while.

Its not like I didn't realize this before. I always have thought of myself as creative and artistic. Hell, I double majored in art until I transferred and had to drop out of art or retake all my classes (grrr, IA state). I had just somehow denied myself the possibility of doing something with this (besides possibly graphic design, bleck) solely because I believed I couldn't do it.

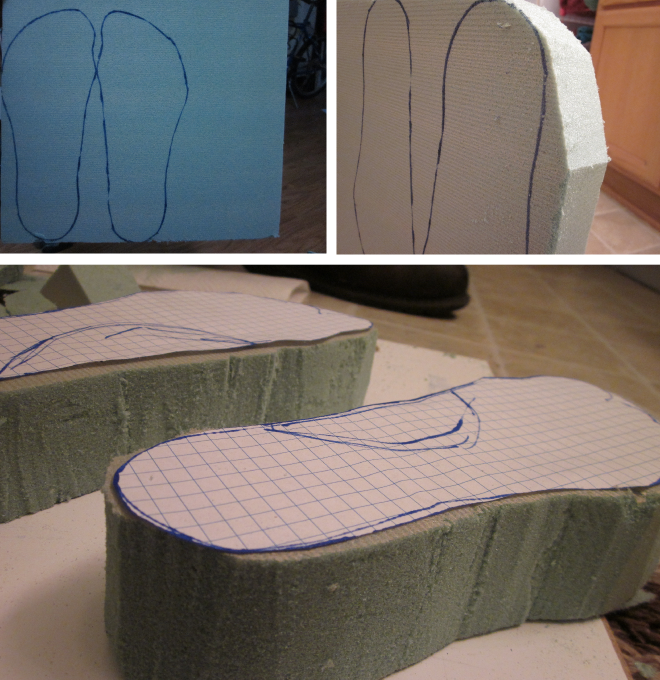
But I am a MAKER. I sometimes doubt my creativity, or my artistic talent, but I know deep down now that I am a maker, and I always will be. And I won't succeed in life or be happy unless I am busy making in some way or another. So I decide to stop half assing that part of my like, and go for it. So I challenged myself to make 12 pairs of shoes this year (one a month) and see if I can figure out how to get good enough to turn it onto a business. Maybe I will make shoes in the future, maybe I won't. But I know if I don't at least try, I will regret it the rest of my life. I am going to record my progress here, and if you people like it, awesome, if you don't thats fine too.

If anyone can learn something from this post, it should be to remember who you are, and let yourself do something that allows you to shine. And obvious and overused idea, I know, but one that does not hurt to be said again. It is incredible sometimes how many times I have to see the same pattern or idea over and over before it sinks in as fact sometimes.

I still make sandwiches at Burgie's (and drinks, and people's days) but I am making things. Maybe not the most exciting things, but things that matter. And I think I will continue doing so and be happy there. Some days it sucks and everyone if mean and crabby, but some days I am invincible. And I get to MAKE things.If in the future, I can find something to do where I run the show, that would be awesome, and I will do that instead.

But for now, I will make shoes, and sandwiches.

05 March 2014

How to Make Shoe Lasts out of Foam Board

I'm not sure how well I can explain how to do what I have been doing for the past two hours, but I am going to try! I think it might be helpful if you got a PhD in sculpting...

You will need:
  • foam board
  • paper
  • marker
  • masking tape or other slightly sticky tape
  • toothpicks
  • floss (optional)
  • scissors
  • knife
  • sandpaper (optional)

The foam board I bought from the flower section at Wal-Mart. I think normal people use this to make floral arrangements? Here is a picture of the label.If you can find some of that white Styrofoam like stuff people make wreaths and stuff, that could probably work. But get the stuff in a rectangle shape, not wreath shape. That will not work. If you get the size I got (1.8*11.8*17.8) and don't have huge feet, it will be enough. To be safe, make sure there is enough for you to trace your feet out twice on the board.


First, trace around your feet on some scrap paper. Then trace it onto the foam board.


Then, using a knife of some kind (I used one of the big ones in my kitchen) cut out your foot pattern. Try to cut at a right angle if possible so that the piece is approximately the same size on the top and the bottom.


Strategies
You can use dental floss to cut  the foam out by gently rocking the dental floss back and forth against the area you want to cut. My brilliant husband thought of this idea!!
Also, it can be helpful to cut out wedges for going around the more difficult angles so you don't accidentally rip the foam board.


Next, lay your foot sideways and trace around it. Then tape it to the side of your foam and trace areas that need cut off.


And cut...


Now set your lasts onto some of the leftover foam board. Mark where the shoe starts to angle downward on the toe. You will not need apiece longer than this. Cut out a rectangle shape wide enough to cover the bottom pieces.


Stab some toothpicks into the bottom piece. Make them fairly perpendicular so you can slide the top part on. Then put the top on.


Now tape that side piece on again and trace the side for the top half. And cut it out.


Spend a good deal of time looking at your foot. Mark on the last where various parts that stick out and where you need to cut a little off. Make sure to cut only a small amount at a time. Start with rounding out edges here and there.


One strategy you can use to get the top the right height is to measure over the curve of your foot in several places and on the last in several places, and adjust accordingly.


So to summarize main areas to shape:


Once you are happy with the shape you made, add some additional toothpicks to enhance the stability of the structure.


Good luck! Happy Cobblering!!


04 March 2014

How to Draw a Dinosuar!

Brachiosaurus is the real name this fellow likes to go by! His long neck helped him eat leaves out of tall trees! Let's bring him back to life... at least on paper!


For this Tutorial, You will Need:

  • A purple marker
  • A black pen
  • some paper
Below is a nice Ed Emberly style follow along guide :)


And the Winner is....

Wool shoes it is! After some deliberation, I decided on the wool shoes since it is freaking cold out! Also, I think this project will work better with some of the other things I want to accomplish this month, including a working pair of lasts. My last pair was an utter failure, but for some reason, is one of my most popular posts, so I think I better post some better content this time around!

check out these wool beauties!!

List of items to get:

Slippery fabric or, "netting" as the video refers to it...

I think it is a sheer slippery material so that you can see through it to the felt stuffs and it won't stick to the wool while doing the felting process.

Shoe lasts (Of which I will be attempting to make????)

I bought some of that goofy foam stuff they sell to people who are talented at making flower arrangements which I plan on making into a sort of shoe last type thing. I think it will work. I will post more on this later.

Dye~don't want plain white shoes

I am way too messy for white shoes! Evidenced by the fact that I spilled half my coffee all over myself, and the rug, and my winter jacket at the bookstore tonight.... I think wet underwear in a public place means I can't have white things...

Items I already have:

Wool, leftover from my homemade mattress project.

Soling material, in the way of leather and rubber options... 


The end.


beautiful!


02 March 2014

March Shoespiration!

So I have spent the entire month of February trying to decide what kind of shoes I want to make for march, and thought I would share a few pictures of shoes I want to make possibly in the future!

First up, we have the WOOL BEAUTY! Boasting an au natural feel, good for warm toasty feet (which here in Iowa is awesome, since it has snowed practically every other day for weeks!) and a simple construction method that has the possibility of being slightly less labor intense... Give me a break, I made a pattern FROM SCRATCH last month! :) Below is a picture of some beautifully handmade wool soles by Etsy seller Inga S at her shop, BureBureSlippers. I would be following THIS video I found online to make them. Another plus, I already have all the materials I need!

https://www.etsy.com/shop/BureBureSlippers

Next, we have these lovelies that I found on Pinterest one day, and it took me FOREVER to find the image on their website, but  HERE is the link so you can find it easy-peasy. Nadia Esra uploaded this picture. I am not really sure what the site is for, but from what I can tell, I think maybe models/fashionistas post fabulous pictures of themselves in beautiful clothing?? Anyways, turn your eyes to the awesome-pants red kicks she has on. I want those!!! Should I try to make them??


Finally, I thought It would be nice to have some simple black shoes that would be on the dressy side, though I am snot sure exactly what they would look like. Some candidates include the ones featured below. I will probably wait and make this my April project, since I haven't really decided what sort of   shoes I want, but I thought I would put it out there as a plan for some time hopefully soonish... (Links to 1, 2, and 3)


So I will let you know soon what I decide on! Let me know if you have a preference or any suggestions for some other shoe style you want to see me attempt!

Popular Posts