Hello all! I have been quite remiss in my blogging duties as of late. I have shut down my Etsy store until the baby arrives and have basically just not done much since, so there is not much to report. Planning to do cloth diapers, so I made a few fitted covers and prefolds as well as worked on fixing one of my husbands flannels to have nice looking sleeve plackets (I made the cuffs too tight last time, and the plackets provided too much of a breeze for him in the winter, so I am doing the overlapping more complicated kind this time).
I have also gotten OBSESSED with character creation in inkscape as of late, since it requires no bending over or sitting on the floor which it getting quite difficult with the baby getting so big and all. I have done Little Red Riding Hood, Hansel and Gretel, and a couple more fun fairy tale theme characters complete with a simple scene for them to live in. Head over to my portfolio to check those out! I am hoping I am slowly becoming a vector art master :) I am hoping to come up with some way to sell these designs in the future, maybe on fabric or making greeting cards or notebooks or something like that. I'll keep you all posted on that as things develop.
Anyhow, I figured I would add a quick line to let you all know I'm not dead, just lazy and pregnant! lol Due the 27th. I am ready though anytime! :) (sorry no pics! Seriously though check out my other blog, and you can get pics a plenty!)

30 September 2015
Leather Laptop Messenger Bag: Weekly Update
Hello everyone!
I have been working on a new bag design this week. It will be very similar to my Artist's Leather Messenger Bag, but this one will be slightly larger and thinner to allow for a laptop computer. Here is my inkscape mock up of how I am thinking the design will end up.

I have started on the prototyping process. Here are a couple pictures of the different versions I have come up with.

I think my husband's favorite part of my business is that he often gets the new products I come up with, and this bag is no exception. I am making it to be the right dimensions for his laptop and cord. Ideally, the final design would be made to order, and I could fit it to the dimensions of each individual customer's laptop.
The biggest challenge so far is to make an attractive looking pocket for the cord to fit in, as it is an awkward sort of thing to put in a bag. My husband insists that he would love for the charger to be in the flap area of the bag so that it it easy to grab when the bag is sitting open, so that is how I have designed it. I am still toying with the option of adding a gusset type piece stitched into the side of the flap (see flap B) to give it a bit more of an area for the charger to fit, or if I should just allow it to sit in a flat pocket (see flap A), where it will likely stretch the leather out a bit over time to create more room if it needs it. Hopefully this picture shows what I mean:

Also trying to decide if I need some snaps or a zipper to keep the pocket flap closed when not in use.

For this particular bag, my husband picked out some really nice 4oz buffed cowhide.

Other than that, I have been looking through some of my shoe listings and trying to update my item descriptions and really trying to think about what it truly important in my products. What makes it unique, what would make customers pick me over other options.
As you may or may not know, I am going to have a baby in the next month-ish, so I have been slowly removing listings, especially those that take a long time to make, in order to prepare for the inevitable break I will be taking from my shop. I will be putting it in full vacation mode probably end of next week or the next, depending on how things go. I am trying to use some of this time to refocus my goals so I can come back strong when the store is back up and running.
Anyhow, I'm supposed to post a link to this post on Facebook in about 4 minutes, so I better be done for now. Tune in next week! (If there is no next week, you can assume I am pushing out a baby or am very busy nesting and you can expect to get an update on that soon as I can!)
23 September 2015
A Moccasin Marathon Success and Leather Boiling Fail: Weekly Update
Hello everyone!
Is is possible that I let two weeks slip away just like that? Apparently it is! Anyhow, here's a recap of what I've been up to the last 14 or so days.
 First, let's start with the success, which I managed just yesterday. I made a goal for myself to finish an entire pair of shoes start to finish including the pattern all in one day. I usually work on one project for a couple hours and then switch to another task for a while, but I thought it would be interesting to know exactly how long a pair of shoes takes to make. Now this certainly wasn't ideal circumstances by any means, as I encountered some problems along the way which slowed me down a bit, but altogether it worked out ok. I started around 9:40 AM, and completed them just after 12:30 AM. Don't worry, I took about an hour and a half break for lunch and a break for supper and rejuvenation at the bookstore, so in all, it took around 8 & 1/2 hours to complete one pair of moccasins.
Problems I ran into (in case you were curious) included needing to stop and sharpen my very dull skiving knife, it being difficult at times to see what I was doing since I was working with a very dark colored leather, and working with a cheap awl for some of the stitching.
I bent my nice awl last week and am waiting on the replacement still, so there wasn't much I could do about that. Thankfully my slicing blade awl was still working just fine, so I was able to stitch the soles on easy-peasey as ever. However, I didn't want too big of holes on any of the upper, and so used a crappy awl I picked up from Hobby Lobby's jewelry department. What you need an awl for when making jewelry, I don't know, but I wouldn't recommend the one Hobby Lobby keeps on hand unless you are not going to be poking a lot of holes in one sitting.
I also think I need a good lamp to help with the visibility issues, though it is a little crazy how much more difficult it is to see the darker the leather is. I notice this difference when I do my messenger bags as well.


Well that's it for now! I will try to return to a doing weekly update instead of the elongated version, since I think I might have missed some things, and this ended up with a lot of random stuff jammed into it. Happy Wednesday!
Is is possible that I let two weeks slip away just like that? Apparently it is! Anyhow, here's a recap of what I've been up to the last 14 or so days.
Moccasin Marathon Success

Problems I ran into (in case you were curious) included needing to stop and sharpen my very dull skiving knife, it being difficult at times to see what I was doing since I was working with a very dark colored leather, and working with a cheap awl for some of the stitching.
I bent my nice awl last week and am waiting on the replacement still, so there wasn't much I could do about that. Thankfully my slicing blade awl was still working just fine, so I was able to stitch the soles on easy-peasey as ever. However, I didn't want too big of holes on any of the upper, and so used a crappy awl I picked up from Hobby Lobby's jewelry department. What you need an awl for when making jewelry, I don't know, but I wouldn't recommend the one Hobby Lobby keeps on hand unless you are not going to be poking a lot of holes in one sitting.
I also think I need a good lamp to help with the visibility issues, though it is a little crazy how much more difficult it is to see the darker the leather is. I notice this difference when I do my messenger bags as well.
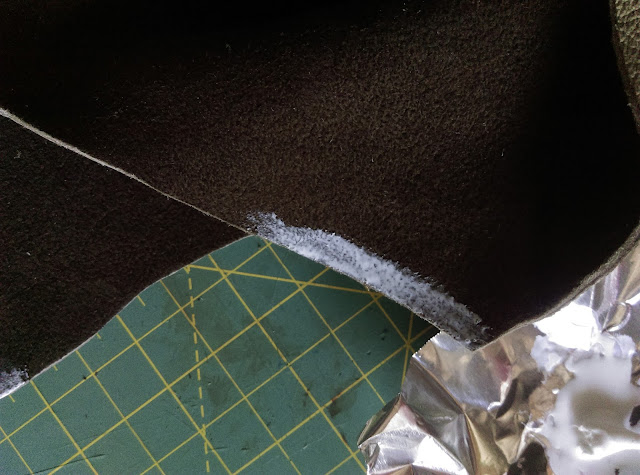
Skiving Explained
I thought it might be worthwhile to make a little picture to show the skiving process. I skive the edges around the heel bit I add to the back of the shoes for added stiffness, durability and to give it a bit different look than a traditional moccasin style. It is an important step; if you don't do it, it can lead to discomfort while walking because of the ridge it can create where the edge of your foot presses down. It may seem like something so thin wouldn't matter, but believe me, it does! There are lots of other reasons you might skive leather, but this is the main reason I end up needing to do it in my day-to-day activities. So basically, you use a REALLY SHARP knife to taper the edge of the leather from its current thickness to as thin as possible along the edge, making the edge angled, rather than square. The knife has to be razor sharp or this process is a giant hassle, and dangerous too, as it is easy to slip with the knife and gouge your fingers or other nearest body part instead. Here is a picture which I hope sort of shows it visually in an easily understandable way.
Leather Hardening
Another project I worked on a bit ago was to heat up some of my veg-tanned leather in an effort to toughen and harden it for soles. My husband and I worked on this project together, and used this tutorial. We only left the leather in for 30 seconds, but we must have done it wrong, because in the end the leather was very brittle and cracked when I tried to bend it. We kept it at or under 180 degrees, so the heat wasn't too high. If anyone has any suggestions, I would love to hear them!
Other Projects
Here are some pics of other projects I worked on this week. I made some moccasin boots for a customer, and made a bunch of veg tanned animal cutouts. I also made another messenger bag like this one.
Well that's it for now! I will try to return to a doing weekly update instead of the elongated version, since I think I might have missed some things, and this ended up with a lot of random stuff jammed into it. Happy Wednesday!
09 September 2015
How to Prep your Leather for Stitching Using Leathercraft Cememt
I have now used leather cement a couple of times for holding seams together before stitching, and have found that it works really well, so I thought I would share my method with you all.

I use Eco-Flo Leather Craft Cement, and it seems to work great for this. It is a little messy if you just try to use the bottle to apply, so usually I pour a little out onto a piece of tinfoil or waxed paper and dip a cotton swab into the glue and use it like a paint brush to apply to the leather. This way, there are no drips or excess glue .
 What you do is to apply a thin line to the edge of your leather where you want to eventually stitch a seam. I would recommend not making the glue line any deeper than where the stitches will eventually be, so you do not have to rip the pieces apart later. I allowed for a quarter inch seam allowance, so I just made sure the glue was a quarter inch or less into the leather from the edge. Make sure to spread it out so that the glue will not ooze when you squeeze the seams together. I used the cotton swab for spreading and applying glue.
Basically, you just continue this down the seam for all of it that you want to glue together. I am leaving the pucker-toe unglued, since it would be too hard to glue an area that will be gathered on one piece and not on the other.


I tried this (gluing the pucker-toe) with Wayne's moccasin boots, and it didn't work out too great. There is so little area you want it to stick in between each pucker that it is very difficult to get even. Thankfully the cement was easy enough to get apart, so it wasn't a big deal, it just didn't help me any in the long run. I instead used the chalk markers to ensure that it puckered evenly along the toe. I placed one hole at each point I had marked with chalk on my pattern and then placed three evenly spaced holes in between each of these holes and this made the pucker turn out great without too much variation along the toe.
Here is how they turned out!

01 September 2015
More Hedgehogs and Boots: Weekly Update
Hello everyone, might sound a bit repetitive, but this week I am again working on hedgehogs, moccasin boots and messenger bags! This week I finished up the screen printing on the messenger bag and delivered it Monday.
Got a couple orders for the hedgehog key chains, so I made a couple more this week. Also officially have a listing up for the hedgehog key chains. I think the pics turned out super cute. :)
 Experimenting with boiling and compressing leather for veg- tanned soles. I have a customer interested in leather soles, and I am wanting to make sure they last as long as possible. I had heard about compressing and hardening leather with water, so I thought that would be good to try out. Wayne (my husband) was very excited about this idea, so he tried placing the leather in very hot water (180F) for 30 seconds and then clamping it with a thin piece of wood we had laying around. It seems much harder now. I hope it will still be flexible enough and not brittle. Apparently if you do it too long it can get very brittle. I will need to purchase a wider piece when I do the real sole.
Also working on a pair of moccasin boots for a customer, and a pair for myself. Made the prototype for the customer, and am hoping to send it to him to make sure the fit is good before making the real thing. I am making a pair for myself to make sure I can scale the pattern well for the smaller female sizes before listing on etsy. The pattern seems fairly scalable, so I am happy about that!
Other than that, I have been going crazy making cute vector images in the hopes of translating them to leather in the future! Have a couple intended for screen printing and a couple for future key chain designs. You can see them if you like at my other blog, Cerulean's Picturebook. I also made some fall themed designs just for the heck of it. Getting excited for the fall!
 |
| created an add design option on etsy |
 |
| see this on etsy :) |
 Experimenting with boiling and compressing leather for veg- tanned soles. I have a customer interested in leather soles, and I am wanting to make sure they last as long as possible. I had heard about compressing and hardening leather with water, so I thought that would be good to try out. Wayne (my husband) was very excited about this idea, so he tried placing the leather in very hot water (180F) for 30 seconds and then clamping it with a thin piece of wood we had laying around. It seems much harder now. I hope it will still be flexible enough and not brittle. Apparently if you do it too long it can get very brittle. I will need to purchase a wider piece when I do the real sole.
Also working on a pair of moccasin boots for a customer, and a pair for myself. Made the prototype for the customer, and am hoping to send it to him to make sure the fit is good before making the real thing. I am making a pair for myself to make sure I can scale the pattern well for the smaller female sizes before listing on etsy. The pattern seems fairly scalable, so I am happy about that!
Other than that, I have been going crazy making cute vector images in the hopes of translating them to leather in the future! Have a couple intended for screen printing and a couple for future key chain designs. You can see them if you like at my other blog, Cerulean's Picturebook. I also made some fall themed designs just for the heck of it. Getting excited for the fall!
26 August 2015
Hedgehog Keychains and Moccasin Boots: Weekly Update
Hedgehog Keychain
I am working on a bag for a friend and it was mentioned that the recipient (his lady friend) liked hedgehogs, so I thought I would try to come up with a fun key chain. I am already adding a key hook to the bag, so I thought a key chain would be a nice addition.

He contacted me Monday afternoon interested in possibly a screen printed design on the bag, so here are a couple ideas I came up with!
20 August 2015
DIY Baby Puckertoe Moccasins
 |
| Not feeling the tutorial? Buy them instead at ceruleanjay.com |
Here is a quick graphic showing how I develop the pattern. It is very similar to my Ojibwe Style Pucker-toe Moccasin tutorial, but scaled down and proportions slightly altered to accommodate those little tootsies! I would probably use this pattern for up to 3 years of age. I would want to get a 3 year old to test the doubling width proportion I am using here before applying this pattern past this age.
19 August 2015
Leather Messenger Bag Project
This past week I created a bag for a former coworker of mine. It is very similar to the one that I made for myself, though I added an interior pocket and buckles to the front. It was very rewarding to add in the zipper, since when you hand stitch everything anyway, zippers are much less a nightmare than when using a sewing machine.
I have been using Eco Flo brand Leathercraft Cement to hold everything together while I stitch on this project and have found that it works quite well for this. It doesn't seem to be the strongest of glues, so I don't think I would use it by itself, but it acts splendidly for keeping things nice and flat and smooth while stitching.
I have been using Eco Flo brand Leathercraft Cement to hold everything together while I stitch on this project and have found that it works quite well for this. It doesn't seem to be the strongest of glues, so I don't think I would use it by itself, but it acts splendidly for keeping things nice and flat and smooth while stitching.
12 August 2015
Developing a Moccasin Boot Pattern using Prototypes Part 2
Last time we had concluded with a prototype to fit the shoe last.

Assuming everything looked good and fit properly, you could conceivably be done at this point. However, my husband decided he wanted a slightly taller boot, so i cut out a rectangle shape and added it to the top.

Assuming everything looked good and fit properly, you could conceivably be done at this point. However, my husband decided he wanted a slightly taller boot, so i cut out a rectangle shape and added it to the top.
05 August 2015
Developing a Moccasin Boot Pattern using Prototypes
 I thought I would share a little about how I developed the pattern for the current project I have just completed, my Moccasin Boots.
29 July 2015
Weekly Update: Creating a pattern for the Moccasin Boots
Hello all.
Just had the flu for the past two days, so I haven't accomplished much this week yet. I have, however, managed to make a final pattern for the moccasin boots I was working on last week, and am all ready to have a go at the real thing! YAY!
Just had the flu for the past two days, so I haven't accomplished much this week yet. I have, however, managed to make a final pattern for the moccasin boots I was working on last week, and am all ready to have a go at the real thing! YAY!
21 July 2015
Weekly Update: Moccasin Boots

So I'm going to try to write a little each week on what I am working on, and any insights I may have gained.
For the past week and a half or so, my husband has been obsessed with the idea of having a pair of moccasin style boots, so that is my project for the week.
15 July 2015
3 Reasons Why Leather Shoes are Better for your Feet
 |
| Buy these Childrens Mocs: CLICK HERE |
Leather is a timeless, beautiful material that have covered people's feet for thousands of years. However, walking into a store and looking at the price may cause you to pause before making the investment. Is it worth paying extra to get leather? Absolutely. And here's why.
22 May 2015
Measuring your Foot for Purchasing Shoes
Hello there!
I have a fair amount of my Etsy customers that want a custom size when ordering their moccasins. I thought I would provide a quick graphic showing the simple steps for creating an accurate foot measurement.

The easiest way to get this information to me is to email a photo of your tracing in Etsy Conversations. Since you wrote down the length and width of your foot, it will be really easy for me to scale the pattern to the proper size on my end! Otherwise, for those not tech-saavy, they are more than welcome to mail their tracing directly to me, just ask about mailing directions in Etsy conversations.
Hopefully this all makes sense!
06 May 2015
Origami Blue Jay Tutorial
Hello all,
Its been a while...
Well I did something interesting today so I though I would share!
Make your own ceruleanJAY themed origami bird!

Its been a while...
Well I did something interesting today so I though I would share!
Make your own ceruleanJAY themed origami bird!
Subscribe to:
Posts (Atom)
Popular Posts
-
 CLICK HERE for more views of the finished product on at my Etsy store! So I decided it was high time for another shoe tutorial! I have...
 -
 I thought I would share a little about how I developed the pattern for the current project I have just completed, my Moccasin Boots.
 -
 I'm not sure how well I can explain how to do what I have been doing for the past two hours, but I am going to try! I think it might be ...