24 July 2014

Ojibwe Style Moccasins: First Journey

So I used contact cement to add a veg tan sole to the bottom of the moccasin, and then headed for a week long trip to Michigan! Here is what the soles and tops look like. I tried to really cut the sole down to the parts that would actually contact the ground to gain a super flexible and comfortable shoe. The tops have an uneven coloring since I had just applied the oil and it hadn't had time to saturate evenly yet.


We got all the way to Ludington, MI before I remembered to put them on. Beautiful campsite.

CLICK HERE to see my Etsy listing of this item!

Here are some shots of the lovely downtown area. Highly recommend!


I mostly wore them around the campsite at nights, and during the car rides. I switched shoes whenever I knew we would walk a ways, to preserve the leather soles.


Here are what they look like on my feet on the drive home. So far they are holding up pretty well, especially considering all the side walk I walked on in them that I shouldn't have.


Anyhow, I have really enjoyed wearing them so far! This is my first pair that has fit super comfortably even the first few times I wore them. The others so far have a "breaking in period" mostly in the toe area before they are super comfortable to wear. I need to go back and re-glue some areas where the sole is coming apart from the shoe, but other than that, they have functioned perfectly!

08 July 2014

DIY Ojibwe Pucker-Toe Moccasin Assembly (Part 2!)

So yesterday we were talking about making an Ojibwe Pucker Toe Moccasin Pattern. Today I am going to show you how to sew your moccasins together!

To assemble, line the marks, horizontal and vertical, from the top and bottom and run a piece of sinew through each as place holders. Use your awl to pierce the holes before you run the sinew through. Hold the awl like so, and make sure your other hand grips the leather close to where you plan to pierce it. But don't stab yourself! Be careful!


Pierce holes where the horizontal marks start, and at the vertical mark if you made one. Make the marks far enough away from the edge so they do not rip out later. A quarter inch should be plenty. For the vertical mark, run a short piece of sinew through and tie with a knot you will be able to undo later. You will just use this mark to make sure everything stays evenly puckered on either side. For the horizontal side pieces, tie a good solid knot and use a 2-3 foot long piece of sinew. I made a square knot which I plan to melt slightly with a candle to make the knot hold fast.


Using a simple straight, or running stitch, make the first couple stitches on both sides. The first few do not have to be puckered or gathered. See picture below to see what I mean.


For the next part, with each stitch, pull the bottom fabric in a little so that it gathers slightly. The trick is to make them as close to the same amount gathered each time so there are no major puckers. If it helps, you could have a set number of stitches marked with chalk or a marker to make it easier to be consistent. If you do this, make sure there are the same number of holes for the top as the bottom.


Once your stitches meet up in the middle, you can go back through the same hole with the opposite string, like seen below. You may need to add an extra hole to make sure they are going through the opposite way as the first string. Eg. If the left string went under at one point, the right string will go over.


Finish by tying a knot. If you like, you can continue around top part like I did.


Next, you will have to stitch the back together. A whip stitch is the easiest for this task. Stitch around the top part as seen below.


Now you may want to round the edges of the tab leftover before stitching it down. Just trim to desired shape with scissors.


Using a whip stitch, stitch the tab to the heel portion of the moccasins.


You can stitch around the top of the ankle if you like for added durability like I did, or wear as is! I would definitely recommend the extra stitching around the top, as the leather will be under some strain as you walk in the moccasins. And that's it! Pretty simple, huh? You can cut out a sole and either glue or stitch it down. If you want, you can follow my tutorial for sewing a sole using a channel. Also, a cuff could be added to make boots. If following this tutorial, don't hesitate to ask me any questions you may have!


Good luck!Happy shoe-making!

Click here for a few more pictures of the finished product!

07 July 2014

DIY Simple Ojibwe Pucker-Toe Moccasins

CLICK HERE for more views of the finished product on at my Etsy store!

So I decided it was high time for another shoe tutorial! I haven't been completely lazy this last month or so though, my friends, I just didn't take the time to make a tutorial for my most recent project, an pair of leather flip-flops that are amazingly comfortable!!!

I had hoped to make a tutorial for these, but then I got sucked into a fun fairy tale theme painting project and have spent the last few weeks consumed by that project!

some of the projects...

Do not worry, I will catch up some time soon and add a post about these, as they were super easy and a fun project for an afternoon or so. However, I just finished making a pair of traditional Ojibwe style pucker toe Moccasins, and have the tutorial images ready to go, so here we go!

For this project you will need:

  • paper
  • sharpie marker
  • awl 
  • sinew
  • needle (preferably a leather needle)
  • 4-5oz deerskin
  • thick cow hide or rubber for solesif desired

The Ojibwe tribe used soft-soled moccasins for several good reasons. First and most obviously, the deerskin used was readily available, and one of the best materials around for making shoes in those days. More importantly, however, the soft sole allowed one to be very quiet while walking through the woods, which was essential when hunting or scouting for danger. In addition, being animal skin, it was very breathable. This made them cool in the summer, and warm in the winter. Another plus is the deerskin molds to the shape of your foot after a few times wearing, which results in a very comfortable piece of footwear! I recommend using something between 4-5 oz leather for this project. Deerskin or elk hide make very nice moccasins in my experience.

link to photo used

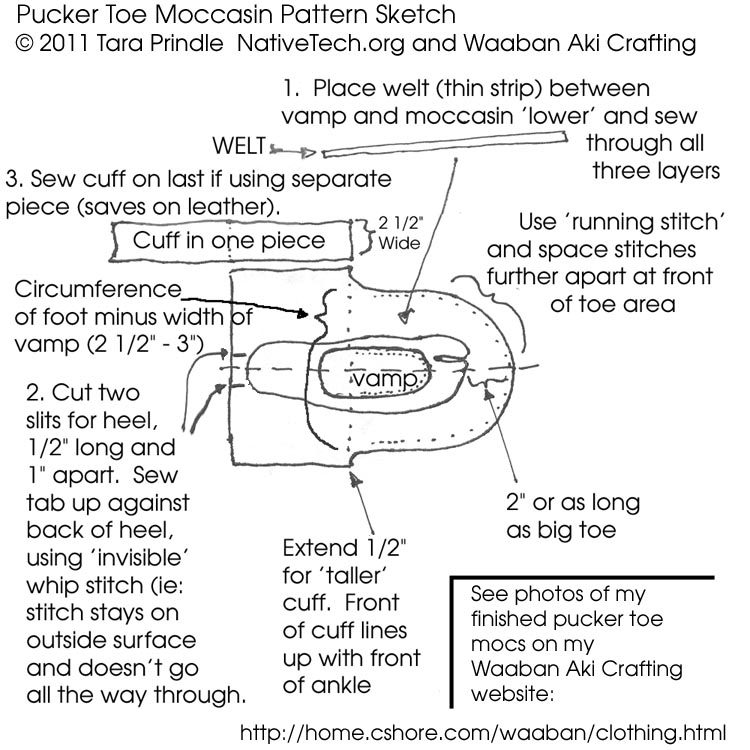
The pattern is relatively simple, and very easy to adjust to each and every persons' individual shoe shape. As with most shoe patterns, it all starts with a simple foot tracing. Use a piece of paper or two taped together. Alternatively, you could use a paper grocery bag or another larger piece of paper you have. Be sure to smooth out any crazy shapes, like individual toe bumps and any bumps made accidentally by your ankle as you trace your foot. Draw a line splitting the shape in half horizontally and vertically. The horizontal line is a perfect spot to start the ankle portion of the shoes, so we will add that later here. The vertical line is useful for getting the heel centred, as well as a good mark for ensuring an even pucker as you sew the moccasins together.


I would suggest cutting this piece out and tracing it onto two other pieces of paper. That way you can have one original you can save for later, or use to cut out a sole from thicker leather (7-10 oz cowhide recommended). Piece two can be used to make the upper or top piece. The third piece can be used to make the lower part of the moccasin.

Below is the top part of the moccasin, no seam allowance is needed, as there will be plenty extra on the bottom, and it will stretch a fair bit since they are made out of leather. The curve starts at the horizontal line. It doesn't have to be curved, it could be straight across, just looks prettier with the curve in it. Mark at horizontal line will help you get it lined up with the bottom part when sewing. You could also mark at the vertical point for more precise gathering later.


Next for the bottoms, mark 1 inch from the tracing round the top  part of the foot. Once you have reached the widest part of your foot, draw the line straight,running straight back to the back line. Add 3/4 inch to the edge behind the horizontal line. This will be the cuff around the ankle. Also mark this spot. This way you will be able to line it up with the uppers/top part. Also mark the vertical mark if you want just like the top for precise gathering.


When cutting out the leather, place on the leather as close as you can to the center back of the animal hide. This is where the skin is the thickest, and therefore most sturdy for wear and tear.  Place it so the stretch is horizontal. You will not want your shoes to get too long when they stretch! Also remember to flip the pattern over so you make both a left and a right shoe!!!

Generally, I trace them with a permanent marker and the cut them out using a sharp pair of scissors. This is how they looked on the piece of leather I bought.


I will post a part two tomorrow on the assembly part for the moccasins. Yawn, but time to go to bd for now! :) Have a lovely night, and happy happy shoemaking!


Links I used to make my pattern:
Indian Moccasins
Native Tech
Wilderness Survival Skills

Update: I just made another moccasin tutorial with an adjusted pattern for Baby Size Moccasins for anyone interested in making some for their little bundle of joy!

01 July 2014

DIY Gathered t shirt project

With summer officially here, I found I was lacking in cool summer attire that is also appropriate for work. As a barista, the dress code is somewhat casual,, t shirts are allowed, but no tank tops, or super short skirts or dresses. I have several cool summer dresses, but they all require me to wear a cardigan with them. Way too hot for July! So, I set about altering this super sweet tshirt from my local co-op to make a classy yet cool shirt for work!

Requirements for this design:
  1. I needed sleeves of some kind to be able to wear to work
  2. I wanted it to be somewhat loose to keep cool
  3. I wanted it to be somewhat fitted
  4. I wanted it to have a little more excitement then a simple v-neck or scoop neck

So here is what I came up with!


 Tada! And here are a couple of photos of me in my classy new shirt!

fake motion shot!!!

rolled up sleeves


Good luck!!!

Popular Posts