
 Most of my inspiration for paintings these days comes from pinterest. As you can see below, the painting on the top obviously has some resemblance to the photograph on the bottom while still being a unique piece.
 I will show you three easy tips I use for using photos to make good paintings.
Tip #1
Find the essence of the photograph.
 Is it the light? Is it the actual objects in the photo? Do you love one part, but wish another part could be a little different, maybe brighter, smaller, different? Decide what is important and what is not. Leave only the parts you love. A painting is never going to be as detailed as a photo. I loved the cabin, but did not really care for the stark,cloudy whiteness of the picture. I kept the general structure of the cabin and tossed the rest in my planning.
Tip#2
Change it
After you have stripped down the photograph to the bare essentials, you have to build it back up again. A cabin cannot be floating around in the middle of the page by itself! I decided it could be nestled in the woods, like my Great Aunt Sophie's house I remember growing up. I love color, so I added more color with a pebble walkway, evergreen trees, and a multicolor shingled roof. Also, attic windows are awesome so I added one of those too. A blue sky and blue tinted snow cheered the scene right up and make it a cheery hideout from the cold.
Tip #3
Tell a story about the piece
Finally, make a painting pop with a story that captures the viewer. I added a shovel, firewood, and smoke from the chimney to make sure that the viewer could know it was a neat and orderly cabin that had a roasty toasty fire welcoming them inside.
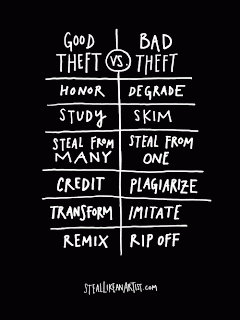 As you can see, the finished product, while like the photograph in many ways, is still unique and different. For a while, I felt guilty when using other people's photos for my artwork, but now I stick to Austin Kleon's Steal Like an Artist tips as shown at right. When it all comes down to it, it is impossible to find something truly unique. Everyone got their idea from someone, who got it from someone else... etc. I always try to show credit where its due and hope others credit me as well. Not to be preachy, just don't want to encourage everyone to go out and copy others' stuff without proper respect given.
 The other side of this, is the gigantic relief of not having the pressure to find that one thing that no one else has ever done before. I find that most folks don't like things too off the beaten path anyhow. Just off to the side enough to feel like you found something new. They don't want to travel through the yet unseen parts of Alaska, they just want to discover the half-hidden path off the side of their campsite to the gigantic blueberry path. (And it was amazing!)
I have a few more examples of this, but they are all currently being scanned so I won't get them back for a few days. Maybe I will make a part two so you can see how I applied this to a few other paintings.
Also apparently google + is smart enough to make this for me using AutoAwesomeness.


